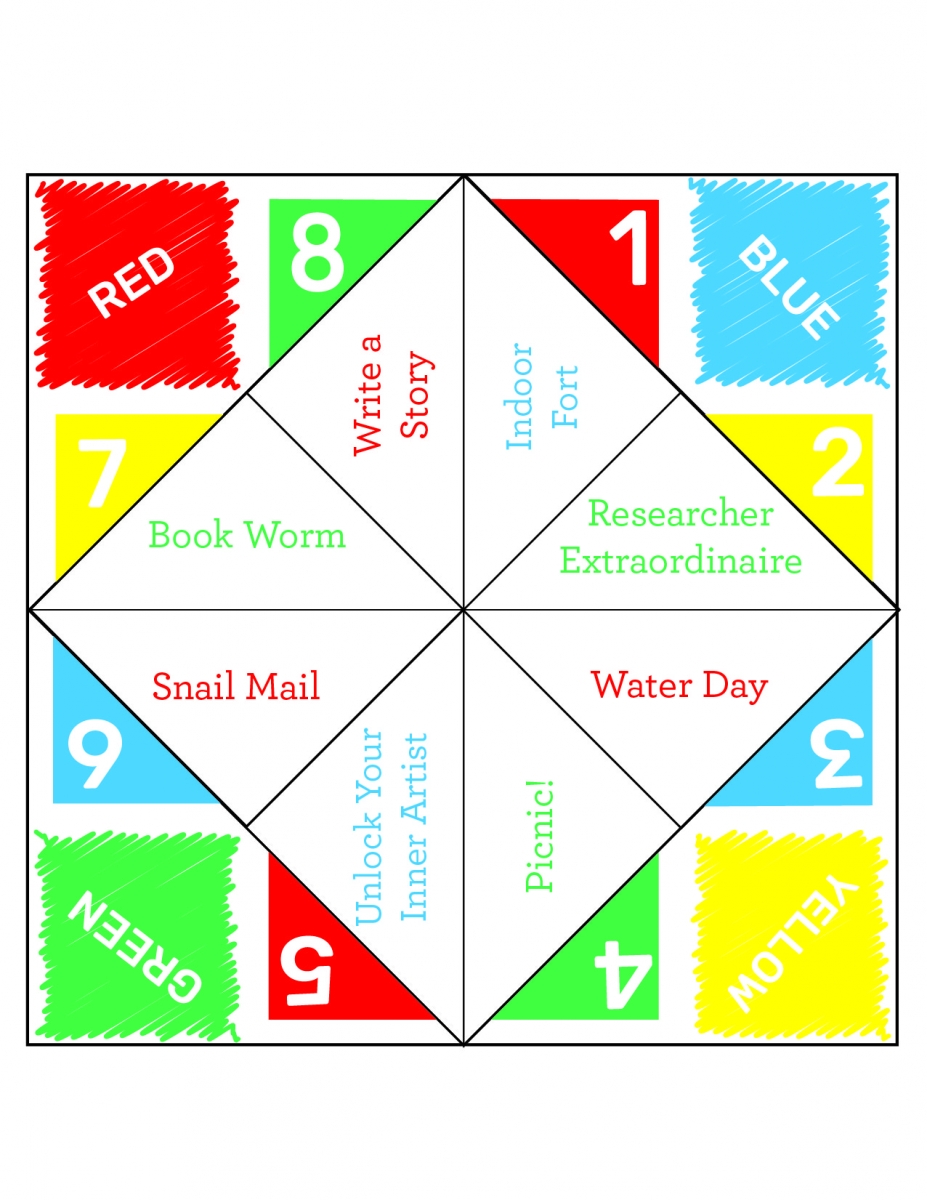
Parents, we know you remember the countless hours spent cutting, folding, and playing with your own DIY fortune tellers (also known as "cootie catchers") as kids! Pass on the fun to your little ones with this classic childhood activity to add some nostalgia and spontaneity to any afternoon.
Our origami fortune teller is full of creative activities to keep little ones engaged and entertained. Families can make a whole day of completing the activities that the fortune teller lands on.
To get your family started, simply print out the fortune teller template, fold it up following our step by step instructions, and let the fun begin! We’ve also created a blank fortune teller template if you and your kids want to customize with your own activities. Little ones can spend time coloring and decorating their paper fortune teller for bonus fun. If you opt for our pre-filled template, we’ve also included instructions for each activity. Let’s get started!
How to Make a Paper Fortune Teller
Step 1: Cut the paper into squares

Use scissors to cut along the border of the template (blank or pre-filled), leaving you with a square shaped piece of paper.
Step 2: Fold the paper diagonally both ways to create a creased X

Fold the top right corner into the bottom left corner to create a triangle shape. Crease the edge then unfold it back out. Repeat with the other side. You should have an “X” shape with the folds.
Step 3: Fold and unfold the corners into the center

Fold the paper in half, crease the edge then unfold it again to the original square. Rotate it 90 degrees, then fold it once more, creasing the edge, then unfolding it. There should be 4 intersecting lines on the paper now.
Step 4: Fold the corners into the center and flip the paper over

Bring each corner to the center of the paper and crease the fold. Now you should have a mini square with all corners meeting in the middle. Flip the smaller square piece of paper over.
Step 5: Fold each corner into the center again

Fold each corner to the center once more. You will again have a square shape. The numbers should be facing towards you!
Step 6: Fold in half and open the pockets

Fold the fortune teller in half so the numbers face in and the square flaps are on the outside. Slide your thumbs and pointer fingers under the squares to operate the fortune teller.
How to Use Your Origami Paper Fortune Teller
Step 1: Your little one should choose one of the colors listed on the square. For whichever color they choose, spell the word aloud while opening and closing the fortune teller with each letter. For example, if they pick the green square, spell the five letters G-R-E-E-N out loud, and open and close the fortune teller 5 times.
Step 2: Now, the child should choose one of the numbers showing on the inside of the fortune teller. Open and close the fortune teller while counting to that number.
Step 3: Have your little one choose another number. This time, unfold the flap to reveal a summer activity!
Pre-Filled Template Activity Ideas
1. Bookworm
Get back into your PJs and snuggle in to spend the afternoon reading your favorite books. Did you know Radio Flyer wagons are the perfect book nook? Just add pillows and blankets to create your own reading oasis.
2. Snail mail
There are so many ways to connect with loved ones online, but nothing beats getting a handwritten letter. Decorate one of our 4 Printable Cards for Kids and let your little ones decide who is the lucky recipient!
3. Researcher extraordinaire
With a parent's help and supervision, kids should use the internet or library books to research their favorite animal. When they are an expert on their chosen creature, they can share their new knowledge by writing a story about the animal, coloring pictures of it in its habitat, or calling a grandparent to tell them what they learned.
4. Water day
Whether you live close to a beach, a sprinkler in the park, or have a hose in the backyard, grab some sunglasses and enjoy the day in the sun. Load up a Classic Red Wagon with water balloons or play some of our Camp Radio Flyer Water Day activities.
5. Write a story
This activity is perfect for big kids and little ones. Depending on the child’s level, they can write a story themselves or a parent can act as a scribe as the child verbalizes their story. Don’t forget the illustrations! There are sure to be laughs during the read aloud at the end. Here’s a prompt to get your imagination going: “The magician pulled his magic wand out of his bag…”
6. Indoor fort
There are endless options when creating the ultimate indoor fort. Start with something tall, like a table, sofas, or even two scooters. Then, drape blankets or curtains over each end of the fort to create a cocoon. Now it’s time for decoration! Stuff the fort with pillows, blankets, books, coloring supplies, or even hang string lights (with a parent's help, of course).
7. Unlock your inner artist!
Break out the watercolors, finger-paints, and stickers for an afternoon of imaginative creation. Need a place to start? Print out these 3 Paper Doll templates for a day of calm coloring and interactive play or try
8. Picnic
Load up your wagon with snacks, cool drinks, and games to enjoy when you reach your destination. Try out one of our 5 ways to mix up your picnic for a new twist on a classic favorite.


1 comment
Thank you for this delightful post! The origami paper fortune teller is such a fun and creative activity for kids. I love how it encourages imagination and hands-on play. Can’t wait to try it with my little ones!